About the yeast

I’m going to start with the yeast since I’m planning to write quite a bit about bread making and yeast-ed pastry (such as French croissants).
Buying, storing and using yeast can be confusing at first: there are different types of yeast and each one of them call for a different way of handling. Thus, here is a quick overview without going into the usual details about how they are made.
Yeast Types
Instant Yeast
 Instant yeast, sometimes called rapide-rise or fast rising yeast , is the most common type of yeast you can buy in a store. Because of the method by which it is produced, instant yeast is 25% more concentrated than active dry yeast and 3 times (300%) more than fresh yeast. Moreover, instant yeast doesn’t need to be hydrated beforehand because it comes in such very small grains that they instantly hydrate when mixed with the ingredients. It is therefore very convenient to use and can be kept for months in the refrigerator in an air-tight container.
One special note though: be careful about its name, as it is sometimes labeled “rapide-rise active dry yeast”, and to make thing even more confusing they’ve even started to call them “active dry yeast”. The size of the grains makes it easy to recognize which one is what though.
Active Dry Yeast
 Active dry yeast, sometimes called levure de boulanger in France, comes in larger grains than the instant yeast. Because of that it needs to be hydrated first. And since they are less concentrated than instant yeast, you’ll need to use slightly more yeast than with instant yeast. But to be honest, you can hardly find this type anymore, and most “active dry yeast” you find are actually instant yeast nowadays…
Fresh Yeast
 Fresh yeast, sometimes called a “cake”, is the yeast usually used by bakeries. It usually comes as a pound compressed cake and it is very perishable. Correctly wrapped in a plastic wrap, it can be kept only up to 2 weeks in the refrigerator, although you can keep it for a couple of months in the freezer. The freezer won’t kill the yeast if correctly wrapped and stored in a container. I usually cut the block of fresh yeast in cubes, wrap them in plastic individually and store them in a plastic container in the freezer. I find this very convenient insofar as it becomes easy to just take one cube at a time when needed.
People often say that fresh yeast gives a better taste than instant yeast. I didn’t experiment a lot yet, but I didn’t find the difference to be extremely noticeable. It doesn’t exactly taste the same, but not having fresh yeast probably won’t ruine your recipe (for trouble shooting, if you have issues reproducing the taste of your favorite pastry or bread, check the brand of the flour first and/or the fermentation/rising time, which gives 80% of the taste of a french baguette for example). Thus, feel free to substitute instant yeast for fresh yeast.
Fresh yeast can be tricky to find and buy. It used to be in the refrigerator compartment, but can hardly be found there anymore. The trick is to ask at the bakery compartment in stores. Or, if you’re living in France, just ask your favorite boulanger. For instance, at Cosentino’s Market in San Jose, CA (unfortunately now closed), they sold me a big block of fresh yeast for $5, which is enough for months and a lot cheaper than instant yeast ![]()
Wild Yeast
Wild yeast is the type of natural yeast which lives everywhere around us. We’ll talk again about this type of yeast when we’ll discuss sourdough bread and the pain de campagne.
Proofing the yeast
 Proofing the yeast has two purposes: activating the yeast and making sure the yeast is not dead. Proofing is usually not necessary with instant yeast, although you can if you think your yeast might be dead.
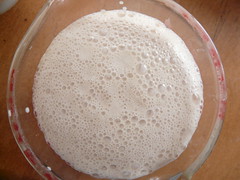
To proof the yeast just add some water (not too hot: it could kill the yeast above 50°C), some flour and possibly a little bit of sugar (not too much) if the recipe calls for it. Mix to dissolve the yeast, and let proof for 10min. After 10min, if the yeast is alive, you should see a foam and some bubbles forming at the surface.
A side note to keep your yeast happy (and alive!): yeast hates salt. Never put the yeast directly in contact with the salt. If you are using a bread machine, put the yeast and the salt in two opposites corners. When kneading by hands or using a robot, I usually start mixing without the salt and add the salt after the yeast is fully incorporated. Furthermore, if you feel that your yeast is not rising enough and you don’t understand why, try using purified water (not mineral water, insofar as it usually contains salt). Your tap water could contain too much chlorine (as in mine apparently).
Conversion formula, equivalence and substitution
Often, recipes call for a specific kind of yeast. It’s fairly easy to substitute a kind of yeast for another using the following formula:
fresh yeast qty = 3 * instant yeast qty = 2 * active dry yeast qty
In other words:
- if the recipe requires instant yeast, multiply by 3 to get the fresh yeast equivalent
- if the recipe requires fresh yeast, divide by 3 to get the instant yeast equivalent
Conclusion
That’s all you need to know about the yeast!
We are now ready for the upcoming delicious recipes ![]()
NB: this post was original made in 2007 for my old blog