The Pastries’ Holy Grail: (Leavened) Puff Pastry

Before explaining the French croissant recipe, we first need to master the making of the puff pastry.
The puff pastry is this dough, usually used for desserts, formed of interlacing layers of butter and dough. Most people usually buy this dough frozen from the grocery because this dough has the reputation to be “impossible” to home-make. Well… Not quite…
Introduction
Although this is definitely not the easiest dough to make, once the process is fully understood, and the common mistakes known, this is not as hard as it might seem at first. But why would you want to make your own puff pastry you wonder? There are at least two good reasons I can think of:
- Home-made puff pastry taste much better than the frozen ones
- There are situations, such as the making of French croissants, when you need leavened puff pastry. In these cases, you’re definitely on your own, insofar as leavened puff pastry is not sold in groceries
You can also like to be challenged or like the idea of making something that most people claimed to be impossible to make at home. Jokes aside, I found it true that mastering this technique gives a certain feeling of achievement, especially when friends ask the inevitable question “WOW, you did the puff pastry yourself?” 😉
To reassure those who already attempted to make puff pastry but failed, I have to admit that my first time was a disaster. But don’t worry, I already did all the imaginable and possible mistakes so you won’t have to :-). This recipe will be different than most recipes you usually find in books and on the internet: most of them just tell you the quantity of the ingredients and roughly the steps you have to follow. That’s why we usually fail because they don’t explain the common mistakes, the little tips and tricks… In other words they just give you a recipe without the experience of the Chef, which is the key to success. Of course I’m not a Chef, but I’m going do my best to pass on my knowledge along with the techniques involved.
There are no quantity of ingredients in this post because it really depends on your use of the puff pastry. I’m only describing the technique itself. Furthermore, at the end of the article I give a couple of links for stuff you could buy to make your life easier.
Step 1: Mixing the ingredients
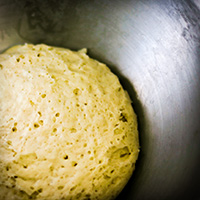
Mixing the ingredients sounds like a simple step, right? Well, it is usually where the first mistake is made. I’m mixing with a KitchenAid or Cooking Chef robot, although sometimes I do it by hand for the fun of it. The key here is to be careful not to over-knead the dough and to use the paddle attachment for the mixer, not the dough hook. If you over-knead the dough and/or if you use the dough hook attachment, the dough is too elastic and it’s almost impossible to roll it properly.
As soon as I see that the ingredients seem to be incorporated and that the dough is formed I stop the robot right away. With the quantity I’m using, I usually knead for about 1 min, not more. I then work the dough slightly with my hands, just to make sure the ingredients are properly incorporated, and to feel the dough and its humidity. After a while, you’ll start to develop a 6th sense about how the dough should be.
The second common mistake at this step, is to either have a dough too dry or too humid. Ok… I know I’m not really helping here… But let me try to explain. If the dough is too dry, it will be very hard to roll, whereas if the dough is too humide it will be too sticky and hard to work with. At this point, you have to learn from experience but to give you a hint, I make my dough slightly sticky but not sticky enough to be a nightmare to work with or to remove from your hands. It’s better to have a dough too sticky than too dry for two reasons: the dough is easier to roll, which reduces the time spent doing the layers, and therefore increasing your chances of success; and the dough gets less sticky anyway once rested and cooled down.
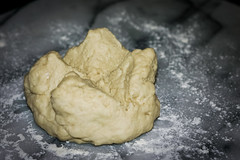
Once you got all the ingredients mixed, make a ball with your hands and cut a cross with a sharp knife as shown on the next picture.
Step 2: Letting the dough relax
This step is very important, and it is also common to forget about it. After you cut a cross with the knife, let the dough rest for about 15-20min. I cannot emphasize enough the importance of this step. This lets the gluten to relax and makes the dough less sticky, and easier to roll and work with. So, don’t overlook this step!
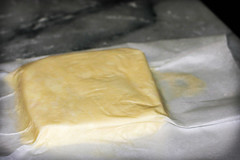
Step 3: Preparing the butter
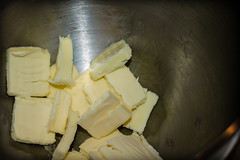
While the dough is resting, this is a good time to prepare the butter for the layering. The aim in this step is to roughly create a ⅓-½ inch (1cm) thick square of butter.
The choice of butter of the puff pastry is very important because it plays a major role in the taste of the puff pastry. Ideally, in France, I would use a Beurre de Charentes (Charentes’ Butter), 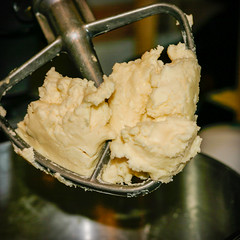 which is a butter called “dry” because it is not as humid as most butter. Having a dry butter makes the layering easier because the butter won’t incorporate with the dough or melt as easily as normal butter. In the USA, just buy a good quality butter.
TIP: to simulate a dry butter, I add a little bit of flour (2 tablespoons of flour for 125g – 4 ½ ounces) to the butter to absorb the excess of humidity.
So back to our square of butter…
- Cut the butter into pieces and put them in the mixer with the paddle attachment.
- Sprinkle the butter with the flour and mix until everything is well mixed and you have a a sort of butter ball/paste.
- At this point I usually use a silicon paddle/spoon to help removing the butter from the robot and I put the butter on a parchment sheet.
- Fold the parchment sheet in half over the butter and start working the butter to a square using your fingers through the sheet.
Step 4: Rolling the dough into a cross
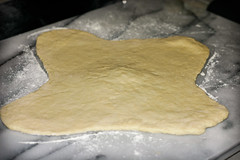 The next step, once the dough rested for 15-20min, is to roll the the dough into a cross as shown on the picture. Of course you use the cross you cut earlier to help rolling it into this shape. Another tip though: the center should be thicker than the ears of the cross. The reason is obvious once we start folding with the butter inside. In short this is because the thickness of these ears adds to each others once folded, therefore they don’t need to be as thick as the center.
Step 5: Cooling down the butter and the dough
Once you rolled the dough into the cross, wrap it in plastic sheets to prevent from a crust to form and put it with the butter (still inside the parchment paper) in the freezer for about 15-20min (depending on the temperature of your freezer, I personally wait 20min). Again, don’t skip this step, this is one of the most important step! This helps bring the butter and the dough to roughly the same temperature. Failure to follow this step inevitably yields to a disaster later in the process… You have been warned 🙂
Step 6: Folding
The real deal! We are going to start folding now. Now on, you should try to work as fast as possible while still being careful about what you are doing. You don’t want to ruin your pastry rushing too fast, but one of the key to succeed is the butter and dough temperature. Both the butter and the dough should have roughly the same temperature (remember step 5?). If it starts being too hot, the butter melts, and you have all kind of troubles: the butter escapes from the dough, it then starts tearing the layers because the dough becomes sticky and so on… Therefore, you have to have some kind of respect for this dough. If you start having issues, if you feel the butter is planning for its break out like in a hollywood movie, don’t be impatient: just put it back in the freezer for 20min. Don’t try to ignore it, learn to respect your butter, or it will be very unhappy and it will make sure to let you know 🙂
You might realize that making a puff pastry during winter is easier than during summer because of the temperature matter. But it’s far from being impossible during summer either. As a matter of fact, I spent most of this summer doing puff pastry and I didn’t have much trouble.
Before going through to the process itself, a few guidelines first:
- Buy a dough scraper. I found this tool to be really invaluable to make puff pastry: whenever the dough sticks, even slightly, to the surface, you inevitably end up with spots of greasy flour on the surface. It’s very important to remove them as soon as possible, otherwise the dough will stick to it and might even tear. That’s when the dough scraper comes into play. One pass and voila! The surface is clean.
- A marble pastry board is also more than helpful. Put your board in the fridge for about 20min while the dough is resting in the freezer. The marble board stays cold for quite a while, keeping the butter and the dough from becoming too hot. This is especially useful during summer…
- If the butter starts to traverse the dough, sprinkle the area with some flour. The same tip holds if the butter escapes too. Just sear the area with some flour.
- Always check, double check, triple check… whether or not the dough is sticking to your working surface. I usually roll a bit the dough, and gently pass my hand under the dough to make sure it doesn’t stick. Then roll more, and pass my hand again… You have to be careful though. Your hands are warm, so don’t over handle the dough with your hands, and be extra careful with your fingernails, the layers are really really thin and fragile…
- If the dough starts sticking to the working surface, it usually means that either some butter are traversing the dough, or that you need a little bit more flour on the surface. Just fold the dough in two over one hand to sprinkle flour on half of the surface, and then repeat for the other half. But don’t sprinkle too much flour.
- You’re going to find it counter-intuitive to have the butter so hard and solid whereas you need to roll the dough with it inside. Resist the temptation of warming up the butter to ease the rolling… It’s a scenario for a catastrophe, trust me I tried that too! 🙂 That’s also one of the main reason of failure. If the butter starts being too soft, it incorporates to the dough, sticks to the working surface, escapes…
The first roll is a little unusual to do because the butter really is too solid to just roll the dough. Therefore, starting from the center of the dough/butter, instead of rolling, you strike with your rolling pin. This will lower the thickness of the butter while extending it. You repeat this operation a couple of time, striking from the center to the edges, until you have a rectangle about ¼ inch (5mm) thick. The thickness is irregular because of the strikes, much like a lot of successive small U shapes, but that’s ok.
Once you reach a reasonable thickness, you can start rolling the dough. Remember to always check whether or not the dough is sticking to the surface. Usually at the beginning of the first roll, I alternate rolling the dough, and the strikes to further soften the dough/butter. After one or two times, you can feel the butter is soft enough to roll the dough. - I already said it, but again, if at some point, no matter what you do, the butter continues to escape the dough, it probably means it is too soft/warm. Wrap the dough in a plastic sheet and put it back 20min into the freezer. I know we all want to complete the dough as soon as possible, but it’s better to take your time than not being able to finish the dough at all.
Ok, enough of tips, here are the steps. In this recipe, we do two double-folds.
- Take the dough and the butter out of the freezer.
- Sprinkle some flour on the work surface
- Unwrap them
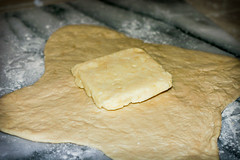
- Place the butter in the center of the cross
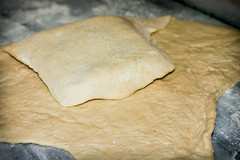
- Fold each “ear” of the cross one by one, making sure to remove any flour dust between each fold to help them stick to each others.
- Make sure the dough is properly secured and wrapped around the butter
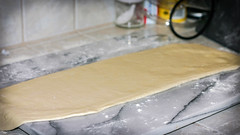
- Roll the dough into a long rectangle
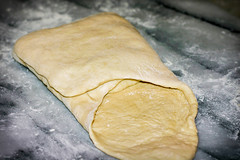
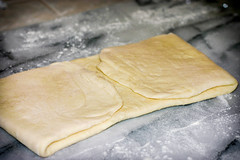
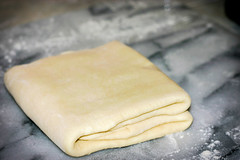
- Fold it as seen on the photos: you fold the sides to the center, and you then fold in half. That’s called a double-fold.
- Rotate the dough by a quarter of a turn (clockwise or counter clockwise, it doesnt really matter)
- Roll it again into a long rectangle
- Make a double fold again
- That’s it, you’ve just made two double-folds! 😉
There is another fold called the simple fold, which consists in folding in thirds: you fold the left third to the right, and then you fold the right third to the left on the top of the other. The number of folds you need to make depends on the recipe. For example, if I was making French croissants, I would be done at this point since you just need to make two double-folds for them. In some recipes you need to make simple folds, in some other you need double folds, or even a combination of both of them.
And one last time, remember to keep the dough and the butter cold enough. Don’t rush it. If you need to do more folds I would advise at this point to put the dough back into the freezer for 20min. I usually put it back one final time when I’m done, before rolling the dough for its final use. Why taking the risk of tearing it during its final roll?
Troubleshooting
I’ll complete this section if I have questions or suggestions.
Problem: When you roll the dough, it has a hard time keeping its shape. It has a tendency to retract a lot, making it very hard to work with.
Solution: The dough might be too dry and/or you might have mixed the dough for too long. Try to have a dough more humid, and make sure you don’t over-knead it.
Problem: The dough is not very elastic, it has a tendency to tear.
Solution: The dough might not be humid enough, or you might have skipped the resting time. The glutten need to relax to be elastic. Try letting the dough rest 20min.
Problem: The butter is not cooperating… It is breaking out, leaking…
Solution: When the problem is minor, and if detected early, just add some flour on the area where the butter is breaking out and make sure you clean the working surface with the dough scraper otherwise the dough will stick to the surface. If the problem is getting worse and worse, put the dough back into the freezer for 20min.
Problem: The dough is sticking to the working surface/board.
Solution: Make sure you don’t have any greasy flour on the working surface. Clean the surface with the dough scraper. Verify also that the butter is not breaking out of the dough, and sprinkle some dust flour onto the working surface. You don’t want to put too much flour, as it incorporates to the dough and changes its humidity and consistency.
Conclusion
That’s it! That was a long post, but don’t be intimidated, it’s not that hard, but every step is important. Follow them carefully and you are going to be just fine.
I hope you enjoyed this post and don’t hesitate to share your experience, questions or problems. I will be more than happy to help if I can, and any feedbacks or suggestions are more than welcomed.
NB: this post was original made in 2007 for my old blog